Saving Your Own Seeds and Germination Testing
Seed Saving can become a very addicting hobby. It is also a way to insure seed quality and purity if done properly.
You can’t or wouldn’t want to save seeds from hybrids, or F1 hybrids. They would not grow true to type, (the original plant). If you plan on saving the seeds just be sure not to buy those kinds of plants or seeds. Seed catalogs label their seeds but some packs I have bought in stores don’t. Also if you want totally organic you have to start with organic seeds or plants.
 Heirlooms are varieties that have been passed down for many, many years, they are what our ancestors grew. In short that means they still have all the vitamins, minerals and flavor they should have and have not been altered. They could be grown to tolerate different climates and be able to have a higher tolerance to disease and conditions naturally over time.
I only grow heirloom varieties. They are becoming more popular now, but are still hard to find. There are a few online companies I order from and feel they are a trusted secure source.
Big companies that sell genetically modified (GMO’s) seeds and hybrid seeds are mass producing and the pure varieties are becoming scarce. Plus, you can’t save there seeds, they usually won’t grow true to type that is what they want so we buy more. The less we support that, the more we are helping keep our varieties from becoming extinct.
Cross pollination is another thing to avoid when planning to save your seed. Hot peppers cross with bell peppers, red tomatoes with yellow, etc. There are isolation distances and methods to avoid that. The Seed Garden book goes into great detail and explains all the how and whys of it all. Many home gardeners don’t have the space for miles of isolation that is usually called for. In that case there bagging and caging techniques, or just grow one variety a season to be safe. Again that is when I refer to Seed to Seed. I have raised beds in my yard and I use isolation cages. I also use distance now that I am on 10 acres.
Some seeds are easy to harvest, others are quite a process and require a lot of technique and time. The plants used for saving seeds should be the best of the best. They must be grown to full maturity usually ripe past the edible stage to insure the seeds are fully mature.
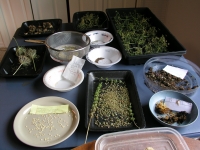
There are basically two methods for cleaning the seeds after harvesting.
Wet processing
Wed processing is for seeds that you harvest wet and they need to washed clean before drying. Tomatoes, cucumbers and seeds that are encased in a jelly like sack require a fermentation process. For that we harvest the over ripe fruit scoop or squeeze the seeds and pulp into a bowl add a little water, stir and set in a warm place (not in direct sunlight) to allow a layer of fungus to form over the surface. You will want to cover with plastic wrap. It will smell very bad so remember that and don’t spill it!
Check daily as soon as the fungus forms they are ready. If you wait to long they will start to germinate. Then rinse through a strainer till clean and dry the bottom of the strainer and lay out to dry on glass dish or something that they won’t stick to. Once you can bend the seeds and they break they are ready for airtight storage.
Dry processing
 Dry processing is for plants that produce seeds in pods, husks or umbrels. Such as beans, peas, carrots, most herbs and peppers. These are usually easily harvested. Collect the seeds by cutting off umbrels or opening the pods remove outer layers if applicable and lay out to dry. When fully dry store in air tight container. After you have done all that you should do a germination test to be sure you harvested successfully.
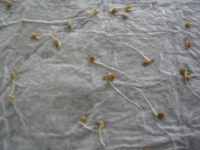
To do this, simply spray a heavy paper towel with warm water. Lay the moist towel on a plate for easier handling and place 10-100 seeds single layer on the towel. Cover with another moist towel and loosely roll it up and put in bread sack with holes. Check daily and spray with water to keep moist. Too wet and they will mold. Keep them as sterile as possible and in a warm place but not in the direct sun.
(Check for specific germination temperatures for accuracy.)
Seeds should sprout in 7-14 days some may take up to 28 days. (Check for the specific days to germinate).
Count each seed that sprouts after 1 week then next and document.
After allotted time, take last full count to figure % rate. Example, 75 out of 100=75% germination rate! The higher the percentage, the better chance of success for that crop. Fluctuations in temperature and other factors could slow germination. Germinating Seeds (above)
Click here for Seed Storage
Want more on GMO’s and Hybrids? See my video page
MORE INFORMATION
Books
Seed to Seed
by Susan Ashworth
Links
Seed Storage
Organic Seed Alliance